eBay

Showing posts with label aircraft. Show all posts

Friday, February 5, 2021

IS-3 "Stalinpanzer" Airfix model kit 1/76 What if

This is a sort of what if; I had lying around a nice IS-3 Turret, but no body. Curiously I had a Tiger body, with no turret. They matched nicely :) . And so I did this "1947 What if", hostilities had continued and a IS 3 had been captured and reused as spare parts.


Saturday, May 4, 2019

ROLAND C11 Airfix / Heller 1/72 Finished Model Kit World War I


After a long time without posting, here I come back to post something. This is the Roland, I got this from the Heller release, bought in an model kit exhibition. My father built it and I painted it along my brother. The purple camo scheme was the most eye-catching, so we went for that. A very unusual model, one worthy to build;


Friday, June 17, 2016

Tutorial; Scratch-building a 1/72 aircraft out of wood and spare parts

Today I'll speak to you about the basics of how to scratch-build your 1/72 own airplane. It will be the Hawker Hart.


The story of this model is looooong and full of adversities. Somehow, I realized the possibilities of creating an aircraft out of wood, something like 17 years ago. At that point, I didn't have internet, even if I had it I wouldn't have bought anything through it as I would have never given my bank details through it, and my local model shops had a limited selection of models. So, I looked what will be the best plane to test this system and I chose the Hawker Fury. That was built and painted with quite good success, and my brother asked me to build another one for him, and I chose the Hawker Hart as the parts would be quite similar. Due to lack of interest, and various hardships, the project was stalled for 15 years until now, where I have accumulated enough spare parts to finish the project without having to create everything out of wood. 


The first thing is to get your hands into some blueprints and reduce them to 1/72. Thanks to modern computing and internet, this will be very easy (at the time, it had to be done mathematically and with some room for error). Only the fuselage and wings are to be made of wood. 


The fuselage is made out of pomegranate wood, which I found quite soft and easy to handle. You can test various woods and see which will fit better, but I don't recommend olive tree wood, as it is very hard to cut and sand, although it is very solid, nor hazelnut tree wood, as it usually has many imperfections. The upper wings are made out of balsa wood, which you have to be very careful when sanding. The bad thing of using balsa is that you can see easily the various lines and marks of the wood, and this wouldn't happen using other kinds of wood, but to sand a flat piece of olive tree will take you forever, although you will get a much more smoother result.


In most airplanes, you will be able to find a similar vosp, exhaust tube, propellers, and maybe even tail wings, but in this case I hadn't anything similar so I had to scratch build them. The vosp is made out of epoxi putty, but you can also use green stuff or super sculpey, or you can carve it out of wood, but as it is very small is difficult to control it (I tried to make it, but it broke before getting into shape).
I miscalculated the piece of wood, and there was no room to make the tail wing along the fuselage piece (in the Hawker Fury model I was able to do it), so I had to use epoxi to extend it.


Curiously, now I had a Hawker Fury of plastic, so I was able to make a mould with plasticine of the rear wings and then with molten plastic cast them (you can also use resin).
To eliminate the gaps between the different parts, use epoxy or any other filling material, that once dry you can sand to make it even.
All the other parts were taken from the spare parts of different models, even the lower wings that were the ones from the Airfix Bristol Bulldog. 
To paint it, I first applied a coat of thick varnish to get a smooth result. 

I went for the Estonian air force version, and printed with decal paper the insignias. The base colour should have been possibly silver, but that would have looked quite bad over the wood, and so I went for a pale grey. The final result is not 100 % accurate, but it looks nice.

So that's it, now you know the basics to scratch build your own aircraft. Of course to scratch built this aircraft now is quite pointless, as the kit through eBay is easy to find, but the same basics can apply to any rare, kitless plane or you can do it just for fun. 

If you have enjoyed this review and you would like to see more, make one or two clicks on the advertising at the top, side or bottom, which will help me in buying more kits and soldier sets to speak about!


Wednesday, June 8, 2016

Review; Revell Fokker Eindecker Dr. I 1/72 Model Kit WW1 Aircraft Fighter Luftflotte Ottoman Air Force

Welcome to a new kit review, today we'll review a WW1 classic, the Fokker Eindecker.

The Box 


A bit too vintage for my taste, it seems taken from a wartime magazine! the exterior design is quite different.


Quite typical action box, with the strange of addition of the pilot in 1st person which gets your attention.


Typical Revell WW1 box, very finely detailed, made most possibly by the same author. Usually I like Revell boxes, but this one is a bit dull, the Fokker doesn't look as different and unique as it should. This is the version I bought.

The Kit 

Another very old kit from Revell, but it looks as if the mould hasn't been used as much as others, as the flash is still within acceptable levels. Everything fits very well, and there is no problem building the undercarriage, which is something fiddly that could ruin a model. The propeller will turn nicely along the radial engine if carefully built, the same as the wheels. 

Also, and it is very appreciated, you get a pilot, a very charismatic one in my opinion.
Accuracy in this kit is pretty good , I would say that only the machine gun was a bit flat and perhaps you could say that the undercarriage is a bit thick but in my opinion that is good enough as otherwise it will be too fragile for handling.

                                       The Verdict

This is another model kit from Revell that can be bought very cheaply, second hand from ebay / street markets (is easy to see if the rack is complete as it a very small rack) or new from a any respectable model kit shop with Revell kits (as it is has been recently re-released) for roughly 5 € only, or whatever that amount is in your country's currency. 

My version

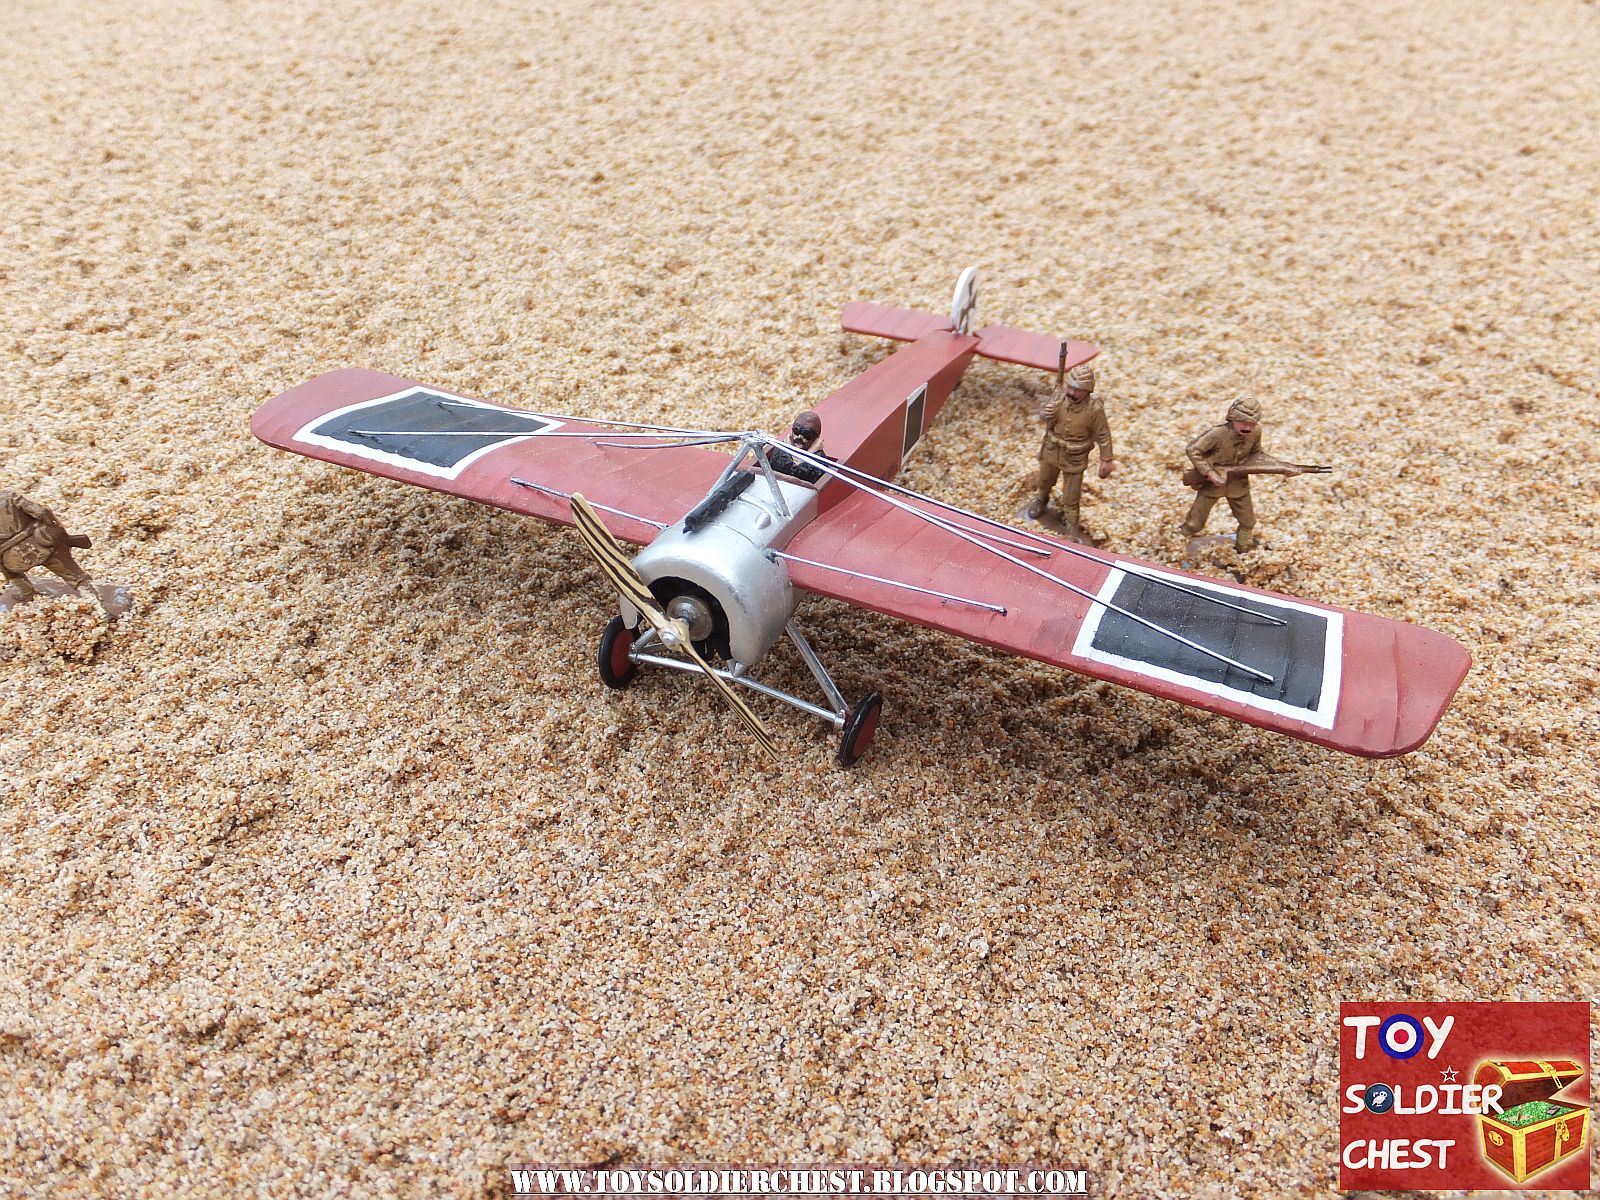
I really decided to buy this kit in part because it was a different design, easily recognizable from other WWI biplanes, but also and in big part because I had seen pics from another modeller which did a very nice Ottoman version. So, for once, I had already decided how to paint it before owning it! a brief researched proved me there was no better alternative, so I only had to choose what shade of brown I wanted to use (I went for a very reddish one). The pilot looks very Ottoman so it fits perfectly. 

The cabling was rather tricky but I am proud of how it looks, I didn't do all the real cabling, because then it will be very hard to handle, and I must admit I did it rather thick, but that helps in solidness.
I used the original decals painting carefully the black square, just as it was done back at the time by the Ottomans, except for the fuselage logo, which I printed out.

If you have read and enjoyed this review, I will greatly appreciate that you make 1 or 2 clicks on the ads on this blog, that will help me in keep making more reviews! (if you can't see the advertising just turn off Adblock or add this blog to the exemption list)


Photos